My Step-by-Step Automated Feeder Journey
Inventing with Technology
The Process
Inspiration


My inspiration for this project was my two cats that i've had since kindergarten. As my family had moved around states and several houses waiting for construction to finish, my cats weren't allowed in the rental houses we had, therefore, leaving them to stay in the unfinished house without us needing somebody to go over there everyday to feed them. Although we are moved in now, I wanted to create this for my cats to make sure that they are fed everyday, and to take the hassle off of getting somebody to take time out of their day to feed them for times when we are out of town.
Designing
After figuring out what my project was going to be, I needed to figure out what it was going to look like. To do that, I draw these two sketches - one from the front and one from the side to get multiple views and a vision of what I was going to need to accomplish
After drawing my design out, I came up with a list of different materials and skills I needed to learn to complete my project to have it all layed out. These included:
Materials:
-
microbits
-
wood
-
plastic food bowls
-
french cleat
-
alligator clips
-
motors
Skills:
-
motor control
-
microbit communication
-
water detector
-
weight sensor
-
coding
!! the materials and skills I thought I needed at the beginning ended up being very different to the things I actually ended up using. This project was a lot of trial and error. !!


Coding
The first step I took in starting my project was coding. Follow these images to watch my progress:
Click here to learn more about each of my different stages of coding on my Unrulr
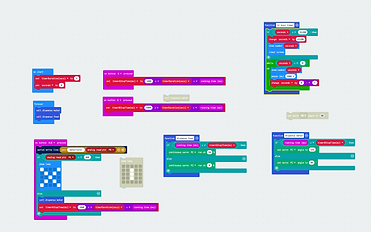


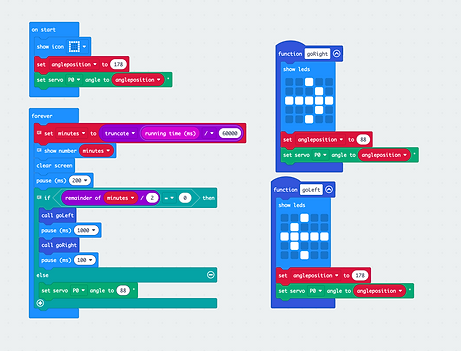
coding stage 1
This is my final code. In this code on start its going to show an open box icon to show it is on. Then I created a variable called angle position so that I could easily dictate how many degrees I wanted to servo to move. On the start, the servo is set to 178 degrees to set the angle position to open. To dictate the amount of time in between food servings, in the forever loop I created a variable minutes, and set it to the truncated (rounded) running time, which is measured in milliseconds divided by 60000 to get the accurate number of minutes ( with a series of tests i discovered that even with pauses, the time will always be 100% accurate.) To make the food dispense, I created two functions: goRight, and goLeft. These two functions turn the positional servo left and right 90 degrees to create an opening so that food can come out. These functions are called when the remainder of minutes divided by 2=0, so that it is a multiple of two and therefore will run every 2 minutes. For my presentation I have minutes set to two, but when this will actually go in my house, I will set it to 720, which is equal to 12 hours. The code is then set so that when its not a multiple of whatever number is put in, that the servo will turn to 88 degrees, ensuring the food dispenser is set closed whenever not in use so no food spills out.
coding stage 2
coding stage 3
click here to see this code work in a simulator
3d printing
3d printing was the most time consuming and important part of my project. I used 3d printing to create not only the base of my project, but several other features. Take a look here:
Base Funnel

This was the first model of my large funnel that was going to attach to the bottom of the main holder of food. Out of this print, I got the correct dimensions of the plastic tub to fit in and the general shape, but it needed more.


For my second model, I decided to add a french cleat (not being the right angle), a servo holder, and a blocking point for food to come out. After printing this out, I realized I needed more support, a better french cleat, and more room for food to come out.

!! there were other models I made with things wrong with them that werent as significant as the ones shown above, as said before, this project was mainly trial and error. Some other models are shown on display that you are welcome to look at. !!

This was my final design for the base of my project. It is a large funnel tat clips into the food bank with a french cleat built into it so it can hang on any surfaces with another french cleat mounted to it at a 45 degree angle. There is a holder built in place for the servo to clip into, as well as a point for the servo to stop to so more food dosen't come out when its not supposed to. I also made the area where food falls out larger so that there is no chance of it getting stuck

Spinners+Other Parts
Another part of my project that I 3d printed was the spinner that was going to attach the the servo so food could go in and out. To make this, I measured the diameter of where the spinner would rest so it attaches to the servo without causing friction to the blocker beneath. I found this diameter using the model above.

The middle of the spinner is thicker than the rest so that the servo horn could attach easier, and have the ends leave less space in between the blocker and the spinner so it could easily push out stuck food.

Another thing that I 3d printed was the lid to the container and lid holder to hold it when you were refilling it with food. These were very simple to make, but helps complete the design on the whole machine.

Another thing I 3d printed were these little rectangles that I called "bits" these bits were placed on the servo holder to hold it up a little bit more to keep from having the spinner cause friction and stop working because of the sides of the funnel. It was also an easy 3 minute print, instead of an 11 hour print to make the servo holder higher up.


I also 3d printed a guard to limit the amount of food weight that is placed on the motor to keep it from not spinning so it can function well. The cone top also helps for food to always go down into the "drain" so that its not all resting on it.

The final thing that I 3d printed was my micro:bit holder space. Because in my first prototype, I had all of my wires and technology sitting wide open in the lid, I decided to clean it up by giving it it's own space. All of the different holes in it are for wires to go through, to show the micro:bit, and the one on the far right is to be able to turn the battery on and off whenever you want. This makes my whole design much cleaner and uncluttered.

Building
My first step of the building process was to attach my motor head to my spinner so that they would work together. After lots of trial and error, I figured out that the best way to do it was to drill through the holes of the motor head into the spinner from 4 places, put the motor inside the funnel so that It would actually fit to get inside, super glue, and then put screws through the holes to make it extra secure.


The second part of building was soldering my wires to my micro:bit. Because the solder is resistant to the letters and numbers written on each of the pins, the soldering work was very likely to come undone because it simply wasn't as strong as it could've been. To fix this, putting a little hot glue on top holds it in place, and is easily removable if necessary.

Here is a picture and vide of the two elements shown above combined. After attaching the spinner to the actual motor and sealing it with another screw that I screwed in bottom up, the wires from the motor attach to the wires connected to the micro:bit, allowing the code to work and making the spinner spin. As you can see, the design of the triangles build into the funnel, prevent food from coming out during times when its idle.


My next step was to attach my micro:bit to my project so that it could be visible. To do this, I cut out a couple boxes in my micro:bit/battery holder so that you could 1. see the commands the micro:bit is doing, 2. be able to download new codes with a box above it to plug connectors in, and 3. on the other side of the holder, so that you could easily turn the battery on and off. I also connected my battery to my micro:bit and gave it a resting spot.

My final steps were painting and assembling. Because the final 3d printed in multiple colors, I wanted to paint it black to give it a more sleek look to it, and to it wasn't transparent in the funnel.

This is the fully assembled version of my project with everything stable and glued in place, scroll down more to see this project in action and get a closer look.
Final Project
Feedback
Feedback was some of the most important part of this process. Here is some I recieved along the way:

From Unrulr:
This piece of feedback was helpful because it inspired me to make two different codes for my food and water dispenser. Although the water dispenser is on pause, the code is ready for it on a different micro:bit
Originally presenting my idea to my parents:
When I originally asked my parents about my project, they said that it would be nice if the food dispenser would refill at a certain time everyday, but the water would refill every time it went empty so that they would always have water. They also said it would be good to have the food bowls be able to be taken out individually to be cleansed and to make the holder of the bowls to be french cleated along with the feeders. When I asked them if they had any other ideas they suggested basic things like coat hangers so I think that for my project I am going to follow through with my idea
After my parents suggested these things, I made sure that I started following through with my pet feeder project as well as start my idea for a bowl holder that is separate from the machine. It inspired me to build the box that I have no hold the two bowls made out of wood. I decided ot not use the french cleat on the bowls because it would be harder for my cats to eat from if it was raised up
When showing my parents my final project in action, I asked them 3 questions, here were their answers:
Showing my parents a final version in action:
1. is there anything that is confusing about my project? How do you think I could make my project easier to understand / use?
When I asked my parent this, they told me that to make my project easier to understand, I would need to add a cable or some sort of machine to have each customer alter the timing and amount to their needs. This way it's not restricted to just one way of feeding, but offers several different functions to whatever the customer would prefer.
2. What other features do you think I could add to increase the function or aesthetics of my project?
Some additional features that my parents thought would make this project better are to make the micro:bit outside of the device so that it is easier to see and know how many minutes are left. They also suggested I make it so that it would also spin on a button being pressed incase the cats have to be fed at a specific time. They said it should then switch the clock to start at zero if you hit a button, so that it would then change the cycle of when the cats are fed for different circumstances.
3. Are there any problems you see with my project and solutions you think would work?
When I asked my parents what they thought the biggest problem with my project is, they said it was the fact that it cannot hold a certain amount of food because it becomes too heavy for the motor to work anymore. My mom actually came up with a great solution that I ended up adding to my project: she said that I should 3d print a few pieces to glue to where the servo holder is connected in, but make it so that food can still come in through a medium sized crack on the sides of it. That way, only a limited mount of food would rest on the spinner, allowing it to work with however much food you want to fill the container up with.
This feedback was probably the most helpful out of everything. It inspired me to add that little bit that helped the machine function so much better. I don't think I will be able to get the other things done in time, but it would be interesting to see if I could add in the future to make it the best it can be.
I want your feedback!

Scan this QR code to a link for a google form I created asking for suggestions on how to improve my project!
Reflection
Challenges
While I was creating my project, I encountered several challenges and problems. Here were the top 3:
1. When I was first creating my project, I started by focusing on my water one. While doing this, I made a lot of progress with making several prototypes, and making a finished working code that uses water sensors to work. After nearing almost the end of this, I encountered a major problem: the machine was not set to work tight enough, so it would always be leaking. To fix this, there was no simple solution that would work in time of the showcase, and I would feel very unproductive with my progress because I would know that there would be nothing big to show off. This was the point where I decided that I was going to focus in on my food dispenser, so that i would have something to show at the showcase. This was very challenging because I essentially had to start fresh, and completely shift gears, but now, i am very happy that I did it and am very proud of my work.
2. Another challenge I faced that I overcame was when printed another draft of the water dispenser and had to make lots of edits. At the beginning of the week, I printed out two circular pieces with parts left out to see what it would look like in the funnel. I realized that it would be a lot more sufficient if I kept the one that would be stable already printed out and attached to the funnel to prevent spilling I also built a clip in attachment for the motor to rest of so that it wouldn’t move, therefore, letting only the motor spin so it would be sufficient. I also designed my french cleat. After this was printed out, I noticed several errors in it. The first one being that have a whole quarter of the one piece would make the funnel more susceptible to spinning. To fix this, I decided to make a smaller circle in the middle of it, so that the food could just come out of that and therefore making it easier to block off so it wouldn't spill. Another problem I had was that the two blocks I had that were meant to hold the motor, weren't enough support. So I added a rim around it for the motor to rest in so that it wouldn't rock side to side. I also extruded the two tiny circular pieces that were meant to clip into the motor, and made it so that I would screw it in making it more stable. A final thing that I changed was the french cleat. The first one was blind drawn and I was not aware it needed to be at a 45 degree angle. I also made it backwards which was an easy fix. Although I did come across several problems with my first prototype, I accomplished and learned a lot this week and should be nearing finishing my food dispenser in the near future.
3. The third and definitely most difficult challenge I faced was completely having to restart my project the day before it was due. Right as I thought everything was perfect, I reached my finger to turn the motor back to its original position and it became half. unattatched making it so there was no way I could fix it anymore without a high chance of breaking it completely. Once I realized this, I immediately went into action. I made a list of things I needed to 3d print, and redesigned what would be the lid holder, to a micro:bit and battery holder to make the whole model more aesthetically pleasing. I also printed a whole new funnel and gathered all the other pieces of equipment I would need like screws, screwdrivers, glue and more. This morning I worked all day to assemble and get this together in such a short period of time to have something to present. I am thankful that I knew the ways of how to build it which made the process so much easier after everything was printed. Looking back on it though, I am much more glad that it ended up breaking than in the moment, because there were several flaws in it that could only be fixed if the whole project was redone. For example, the battery and micro:bit were superglued and hote glued to the lid connected by saudered wires that kept coming off and had to be redone. It also dd not look very pretty which bugged me. Now, and battery is tucked in the what used to be lid holder, and the micro:bit screen is showing from the side of it. Although it was the biggest challange yet, I learned the most from it and am much more happy with my project.
Switching from food to water
Major issues in second funnel prototype
Redoing my whole project last minute
Skills
While I was building this machine I learned several skills along the way, some including:
3d printing/modeling - One of the biggest skills I learned along the way of this journey is 3d printing. I learned new skills on how to design, and export the models to then print. With this skill I learned I used it to help several other people with printing and because I became good at it, it is a skill I will always remember and made the whole process so much easier
Using make code - Another super useful skill I learned is how to use a micro:bit and code it. Because I have this skill, I can now use it to code almost anything and have that skill to help with future inventions that involve technology.
Using drills - Another skill that I learned that I will probably be able to use for the rest of my life is how to use a drill and what different heads and tips to use. I had to use a drill a lot in the building process and I learned how to be precise so that my design would be as strong as it can be
Myself
This project not only taught me about how to use different machines in the maker space, but also taught me a lot about myself as an inventor. When I first went into this class, I was pessimistic about creating my project. I thought it would take up too much time and was overall useless. Not even 2 classes after we starting branching off to work on our own projects, my mindset completely changed. I started not only looking forward to going to class, but using up all of my study hall time to come to the maker space and make progress on my project. I learned that once I set my mind to something I don't stop until I get it right. I also learned that I only settle for my best and challenge myself to learn as much as I can. This class also sparked my love for technology, and nearing the end of it I realized that this could possibly be what I want to major in college, and that I wanted to spend every year taking tech classes instead of art.
FAQ
How are you using the micro:bit in your project?
I incorporated a micro:bit into my project by having it send the code to the servo to make the food be able to dispense. I designed a code on make code as shown far above and downloaded it to my micro:bit. Although it dosen't look that pretty, it is located on the lid of my project, and it will show weather the spinner is going left or right based on arrows that appear on it.
How are you using a french cleat in your project?
I incorporated a french cleat in my project the the backside of my large funnel so that it can easily be mounted to any wall with another french cleat attached. I put it in that position because it was easy to add it to my 3d print to make sure its stable and to ensure that all the weight that would be added to the machine would be above it, pulling down, ensuring the machine will never fall of or break because of the function of the french cleat.
What final changed are you planning to make after the showcase?
After the showcase, I am planning to continue to find solutions to build my water dispenser and avoid leakage. I also want to use your feedback to make my automatic pet feeder as good as it can be to then maybe continue to make more.